The particles that make up sparks, splashes, explosions and exhaust plumes
Lander is justifiably famous for its 3D scrolling landscape, with its luscious trees and colourful rockets and inviting gazebos... it really is a beautiful place to fly around, unleashing destruction. But on top of these solid 3D graphics is the particle system, which introduces the third dimension in a more subtle manner.
There are particles from the ship's exhaust; there are particles from impacts and explosions; there are particles that splash; there are particles that bounce; and there are particles that gently rise up from smouldering ruins, amongst others. Individually these particles might not look like much, but when they gather together in clouds, they're as much a part of the 3D world as the buildings and trees.
The particle data buffer
------------------------
Lander supports up to 484 on-screen particles at any one time. Each of these particles has four important pieces of data associated with it:
- The particle's (x, y, z) coordinate defines where it is within the 3D world.
- The particle's 3D velocity vector defines how the particle is currently moving through the world.
- The particle's lifespan counter ticks down once on every iteration around the main loop, and when it reaches zero the particle disappears, so this defines how long the particle lasts.
- The particle flags define the particle's behaviour (see below).
This set of data is stored in blocks of eight words in the particle data buffer, with one block per particle. This buffer lives at location particleData, and each particle's block of data is laid out as follows:
| Word | Contents |
|---|---|
| #0 | Particle x-coordinate |
| #1 | Particle y-coordinate |
| #2 | Particle z-coordinate |
| #3 | Particle velocity (x-axis) |
| #4 | Particle velocity (y-axis) |
| #5 | Particle velocity (z-axis) |
| #6 | Particle lifespan counter |
| #7 | Particle flags |
Along with the particle data buffer, we have a couple of variables that help us keep track of the buffer contents. The particleCount variable contains the number of particles currently on-screen, and the particleEnd variable contains the address just past the end of the last bit of particle data in the buffer.
We can add a new particle to the buffer by calling the StoreParticleData routine, which simply takes the eight words of data for the new particle and appends them to the end of the buffer, before updating the buffer variables and adding a terminator to the buffer. The buffer is terminated by a null entry that has a value of zero in the last word (so if the particle flags are zero, we have reached the terminator).
We can delete a particle from the buffer by calling the DeleteParticleData routine with the address of the particle to delete, in which case the last particle in the buffer is moved into the space left by the deleted particle, and the buffer variables are updated. This ensures that the buffer is always continuous and has no gaps.
The particle data buffer is a simple data structure, but the particle model is pretty sophisticated, not least because different particles can behave very differently. Let's look at the particle flags that control this behaviour.
Particle types and particle flags
---------------------------------
All the individual particles in the particle data buffer are processed by the MoveAndDrawParticles routine on every iteration around the main loop. We'll look at this process in more detail later, but essentially this routine works through the buffer and applies various rules to each particle according to that particle's flags.
These are the particle flags that define each particle's behaviour, with the specified behaviour applying when that bit is set:
| Bit | Meaning | |
|---|---|---|
| #0-7 | The particle colour as a VIDC colour byte | |
| #16 | Particle colour fades from white to red over the course of its lifespan | |
| #17 | The particle is a rock | |
| #18 | Create a splash on impact with the sea (i.e. add a cluster of spray particles to the buffer, with the number of particles configured by bit #23) | |
| #19 | Bounce on hitting the ground | |
| #20 | Apply gravity to the particle | |
| #21 | Particle can destroy objects on impact | |
| #23 | Splash size (65 spray particles when set, 4 spray particles when clear) | |
| #24 | Explode on hitting the ground (i.e. add a small explosion to the buffer), but only if bit #19 is also set |
Given this set of behavioural flags, the game creates all the different types of particles that we see on-screen. It's worth noting that the rocks that fall from the sky when your score reaches 800 are actually particles - their behaviour is defined by particle flags and they have entries in the particle data buffer. The only difference is that when rock particles are drawn, they use the DrawObject routine rather than the particle-drawing routines (we'll cover the drawing process in more detail below).
The different types of particle are as follows, along with the routines that add them to the particle data buffer and the particle flags that get set:
| Type and creation routine | Particle flags | Screenshot |
|---|---|---|
| Bullet particle AddBulletParticleToBuffer |
|  |
| Exhaust particle AddExhaustParticleToBuffer |
|  |
| Smoke particle AddSmokeParticleToBuffer |
|  |
| Debris particle AddDebrisParticleToBuffer |
| |
| Spark particle AddSparkParticleToBuffer |
|  |
| Spray particle AddSprayParticleToBuffer |
|  |
| Rock particle DropARockFromTheSky |
|  |
The particle flags control the ongoing behaviour of particles, but there's another important aspect of particle creation: the particle's initial state. The particle-creation routines linked to in the above table create the different types of particle, so that's where the particle flags get set, but these routines also set the particle's initial velocity, lifespan counter and colour, according to the particle type. (The particle's coordinates are passed to the relevant particle-creation routine, rather than being dependent on the type of particle being created.)
To help with this, there are three routines that create particles with specific types of velocity:
- AddStaticParticleToBuffer adds a particle with zero velocity, which is used when creating debris, rock, spark and spray particles.
- AddRisingParticleToBuffer adds a particle with zero sideways velocity (so it initially only moves up or down), which is used when creating smoke particles that rise up from explosions and the smoking remains of destroyed objects.
- AddMovingParticleToBuffer adds a particle with velocity in any direction, which is used when creating exhaust and bullet particles (which use initial velocity vectors that point out of the bottom and front of the ship respectively).
On top of this initial velocity, the particle-creation routines add a random element to the particle's movements, so even if we spawn a static particle with zero velocity, the random element will still make it move around; there are no genuinely static particles in Lander. This random element is controlled by two parameters that are passed to the relevant particle-creation routine in registers R8 and R9:
- R8 is set to the magnitude of the random element that's added to the velocity, with a larger figure giving a smaller random element; the actual range is +/- 2^(32 - R8).
- R9 is set to the magnitude of the random element that's added to the particle lifespan, with a larger figure giving a smaller random element; the actual range is 0 to 2^(32 - R9).
These random elements are added to the initial state of the particle, so while they don't affect the ongoing movement of the particle (as that's defined by the particle flags), they do affect the starting point.
The different types of particle have the following initial states:
| Type | Initial lifespan counter | Initial velocity vector | Random velocity range | Random lifespan range | Colour |
|---|---|---|---|---|---|
| Bullet | 20 | Ship nose vector | 0 | 0 | White |
| Exhaust | 8 | Ship roof vector | +/-&400000 | 0 to 8 | White fades to red |
| Smoke | 15 | Rising up by &80000 | +/-&80000 | 0 to 128 | Random grey |
| Debris | 15 | Static | +/-&400000 | 0 to 64 | Random purple brownish green |
| Spark | 8 | Static | +/-&1000000 | 0 to 8 | White fades to red |
| Spray | 20 | Static | +/-&400000 | 0 to 64 | Random blue |
| Rock | 170 | Static | +/-&400000 | 0 to 32 | Random purple brownish green |
So, to take one example, spray particles last for a reasonably long time, with a random white-blue colour and little initial movement, with the particles eventually settling into the sea surface as gravity takes effect:
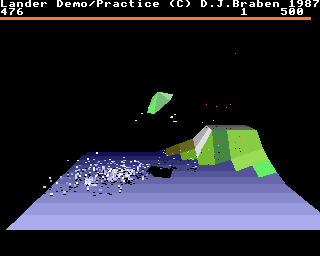
This combination of the initial state and the particle flags creates a very varied set of effects from a relatively simple set of rules.
Explosion clouds
----------------
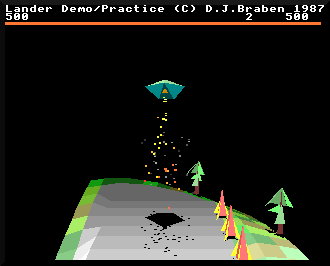
Clouds of particles are generated by creating lots of individual particles, each of them with a random element that sends them off in different directions and with different lifespan counters. The best example of a particle cloud is the explosion effect, which is a very familiar sight to anyone who has tried (and failed) to take off from the launchpad.
Explosion clouds are made up of clusters of particles. Each cluster contains four particles, comprising two spark particles, one debris particle and one smoke particle.
For example, here's a big explosion cloud that contains 50 clusters, which is created by the AddShipExplosionToBuffer routine when we crash. This produces an explosion cloud of 200 particles, comprising 100 spark particles, 50 debris particles and 50 smoke particles. It looks like this soon after the crash:
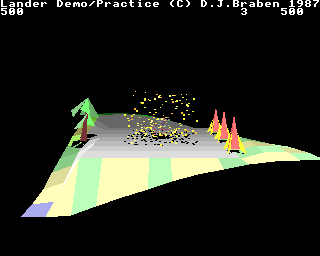
Initially the spark particles dominate the view, but they have a small initial lifespan counter of 8, which is half that of the smoke and debris particles, so the latter remain once the initial explosion burst has subsided:
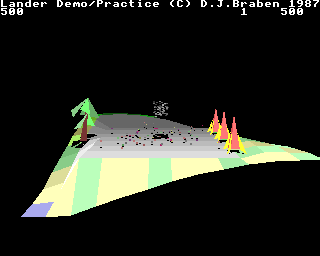
The smoke particles are initialised as rising particles, so they gently drift upwards and don't fly out like the explosion particles, and the debris particles fall to the ground where they bounce around before disappearing.
That's a big explosion, but a small explosion gets shown when a bullet hits an object that has already been destroyed, or when a particle that is configured to explode when it hits the ground does just that. These explosions are added by the AddSmallExplosionToBuffer routine, which creates an explosion cloud of just three clusters (so that's 12 particles). Meanwhile a medium cloud of 20 clusters (80 particles) is created by the ProcessObjectDestruction routine when we destroy an object.
Moving particles
----------------
Now that we know how particles are stored and initialised, let's take a look at how particle movement is processed.
The MoveAndDrawParticles routine takes care of both aspects. It loops through each particle in the particle data buffer, checks the particle's flags, and updates the particle's data depending on its state. The process goes like this:
- Decrement the particle lifespan counter, and if it reaches zero, delete the particle from the particle data buffer and move on to the next particle.
- Add the particle's velocity vector to its coordinate.
- If the particle's flags say that gravity should be applied (bit #20), add gravity to the y-axis element of the particle's velocity vector, so the particle accelerates towards the ground.
- If the particle's flags say that the colour should fade from white to red (bit #16), call the SetParticleColourToFade routine to fade the particle colour according to the particle's age, and store the colour in the bottom byte of the particle flags.
- Fetch the altitude of the landscape directly below the particle.
- If the particle's flags say that it can destroy objects (bit #21), call ProcessObjectDestruction to check whether it is hitting an object, and if it is then destroy both the object and particle (see the deep dive on collisions and bullets for details).
- If the particle is below ground level, call BounceParticle to process the particle hitting either the sea or the ground, as follows:
- If the particle is hitting the sea, call the SplashParticleIntoSea routine, which checks whether this particle's flags say it should create a splash (bit #18), and if the answer is yes, creates the number of spray particles defined in the flags (bit #23).
- If the particle is not configured to bounce on hitting the ground (bit #19), delete the particle as it is now part of the landscape.
- If the particle is configured to explode on hitting the ground (bit #24), delete the particle and replace it with a small explosion.
- Otherwise bounce the particle off the ground by setting the particle's velocity vector to half of its previous speed, and in the opposite direction along the y-axis.
- Store the updated particle data in the buffer and move on to the next particle.
Now that we've moved all the particles to their new positions, let's finish off by looking at how we draw the particles.
Drawing particles
-----------------
As with 3D objects, we draw particles into the graphics buffers, so they can be drawn at the correct depth to ensure everything overlaps correctly (see the deep dive on depth-sorting with the graphics buffers for details). The drawing is done by the MoveAndDrawParticles routine, whose first part already moved each particle, as described above. Part 2 calculates the camera-relative coordinates of the particle, which then get passed to part 3 if this is a rock particle, or to part 4 for all other particles.
The camera-relative coordinates of each particle are calculated by taking the 3D world coordinates of the particle and subtracting the camera position (see the deep dive on the camera and the landscape offset for more about camera-relative coordinates). We then check whether the particle is within the bounds of the visible landscape, and if it isn't we skip drawing this particle and move on to the next particle in the buffer, so we only draw particles within the field of view.
If the particle flags say that this is a rock particle (bit #17), then we jump to part 3, where we check for collisions between the player and the rock, jumping to LoseLifeFromParticleLoop if there is a collision. If all is well, we call DrawObject to draw the rock and its shadow as a 3D object (see the deep dive on drawing 3D objects for details). We then we loop back to process the next particle from the buffer.
If this isn't a rock particle, then we draw the particle and its shadow into the graphics buffers. We already fetched the altitude of the landscape beneath the particle in part 1, when we were working out whether the particle was hitting the ground, so we can draw the shadow particle at this y-coordinate, as it's at the right position for the particle's shadow on the landscape surface. We then draw the particle itself into the graphics buffers by calling the DrawParticleToBuffer routine, and we draw the particle's black shadow with the DrawParticleShadowToBuffer routine. See the deep dive on depth-sorting with the graphics buffers for details of how the graphics buffers work.
And that's how the particle system works in Lander.